How to Dip Coat a PCB | Conformal Coating Step-by-Step Guide
Dip tank setup, viscosity control, immersion and withdrawal rate, curing and inspection
Dip coating can deliver uniform, wrap-around coverage for complex assemblies, but repeatable results depend on more than immersion. Cleaning, masking, viscosity control, immersion profile, withdrawal rate, drainage and curing all determine whether the finished coating is consistent and defect-free.
This guide explains the practical steps involved in dip coating a PCB and sits alongside the wider technical articles on dip coating process behaviour, film formation and stability and dip coating equipment settings and process control variables.
Used correctly, dip coating is scalable and repeatable. Poor control leads to capillary wicking, air entrapment, runs, edge pooling, de-wetting and under-component retention that often only becomes visible after cure or in service.
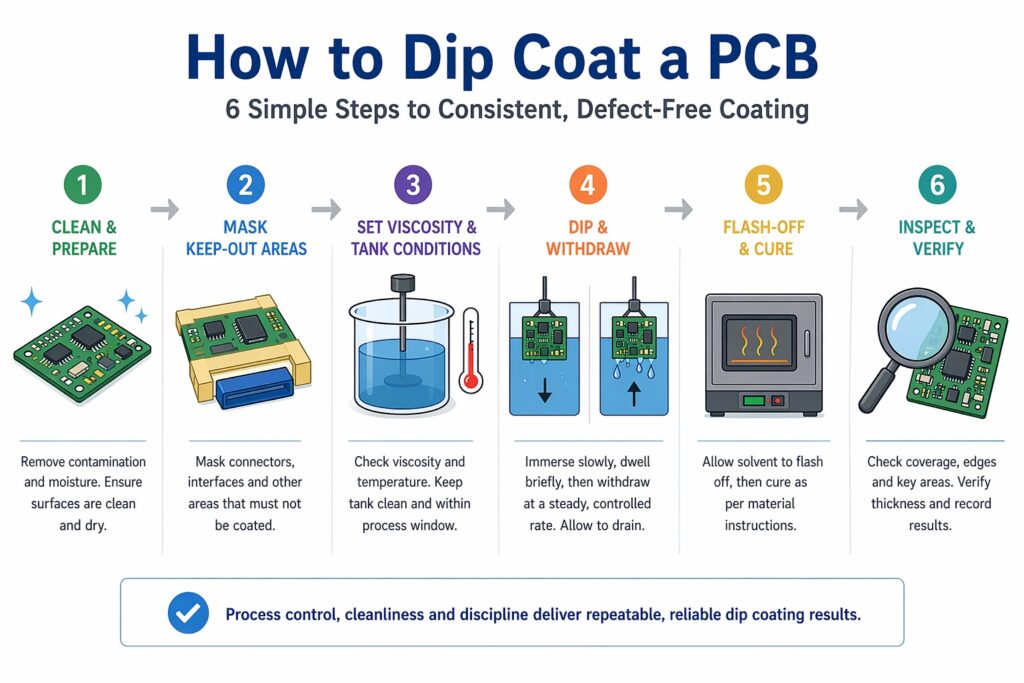
Simple 6-step dip coating process showing how cleaning, masking, viscosity control, immersion, withdrawal, curing and inspection combine to deliver consistent conformal coating results.
Article Quicklinks
| Tools & Materials | 🔗 |
| Step 1: Clean & Prepare | 🔗 |
| Step 2: Mask | 🔗 |
| Step 3: Tank Setup | 🔗 |
| Step 4: Dip & Withdraw | 🔗 |
| Step 5: Cure | 🔗 |
| Inspection | 🔗 |
| Defects | 🔗 |
| Training | 🔗 |
| Useful Links | 🔗 |
1) Tools & Materials
- Dip-grade conformal coating
- Dip tank with controlled lift and withdrawal
- Viscosity cup and thermometer
- Filtration and tank covers
- Masking materials such as tapes, boots or liquid mask
- PPE and extraction
- Inspection tools and witness coupons
For thickness measurement methods, see wet, dry and optical coating thickness measurement methods.
2) Clean & Prepare
Coating only adheres to clean, dry surfaces. Remove flux, contamination and moisture, particularly under components and in connectors.
Poor preparation often shows up later as de-wetting, fish-eyes, weak edge coverage or local adhesion failure. For deeper guidance, see surface preparation and cleanliness for reliable conformal coating.
3) Mask Keep-Out Areas
Mask connectors, interfaces and protected zones using appropriate barrier or reusable masking systems.
One of the main risks here is capillary draw into interfaces during dip and drain. For broader context, see why masking creates many coating defects.
4) Set Viscosity & Tank Conditions
- Control viscosity within a defined window
- Maintain temperature stability
- Prevent contamination
- Track solvent additions and bath condition
For practical guidance, see how viscosity is measured and controlled in a coating process.
5) Dip & Withdraw
- Immersion: too fast can trap air and later cause bubbles or frog-eye type defects
- Withdrawal: strongly influences film thickness
- Drainage: must clear under components rather than leaving heavy retained build
- Orientation: influences pooling and wicking
For the full process model behind film formation, drainage, geometry effects and stability, see dip coating process behaviour, film formation and stability. For a more settings-focused view, see dip coating equipment settings and process control variables.
Controlled dip coating depends on cleaning, masking, viscosity, immersion discipline, withdrawal control and drainage behaviour.
6) Flash-Off & Cure
- Allow controlled drainage and solvent release
- Build thickness in thin layers where required
- Follow the material cure profile
7) Inspection & Quality Control
- Check coverage and edges
- Inspect under components
- Verify thickness
- Use witness coupons appropriately
See how coating thickness is verified in production and how witness boards and test coupons support coating validation.
8) Common Defects
- Capillary flow and wicking into unwanted areas
- Runs and sagging from excessive wet build
- Edge pooling and local accumulation
- De-wetting caused by poor wetting or contamination
- Cracking caused by stress, thickness or cure problems
9) Training & Standards
Repeatable, audit-ready dip coating depends on operator training, not just written instructions.
- IPC-A-610
- IPC-CC-830
10) Useful Links
Why Choose SCH Services?
SCH Services supports dip coating process development, production troubleshooting, training and equipment selection with practical engineering input built around real manufacturing constraints.
- Conformal coating services
- Training for operators and engineers
- Technical consultancy and troubleshooting support
Where dip coating is being considered, SCH can help assess whether the process is robust enough for the assembly, the coating chemistry and the required production outcome.
Disclaimer:
General technical guidance only. Final process settings, inspection criteria, material compatibility and production suitability should always be confirmed through appropriate engineering trials, validation work and applicable customer or industry standards.