Troubleshooting Decision Tree for Conformal Coating Defects
This conformal coating troubleshooting decision tree provides a structured diagnostic flow to identify defects before repair, rework, or escalation. It’s designed to stop the two most common failure patterns: (1) treating symptoms instead of mechanisms, and (2) “fixing” one board while the process keeps drifting.
If you want fast symptom routing first, use the Defect Identification Guide (Symptom-Based Routing).
For the complete index of defect types and links to each technical article, use the Conformal Coating Defects Hub.
Related articles: Decision trees help isolate defects, but many issues originate from the same upstream process weaknesses. For a broader view of why defects repeat across different failure modes, read Why Conformal Coating Processes Fail.
For a high-reliability workmanship perspective on how cleanliness, documentation, inspection discipline and process control fit together in critical environments, see What NASA Gets Right About Conformal Coating.
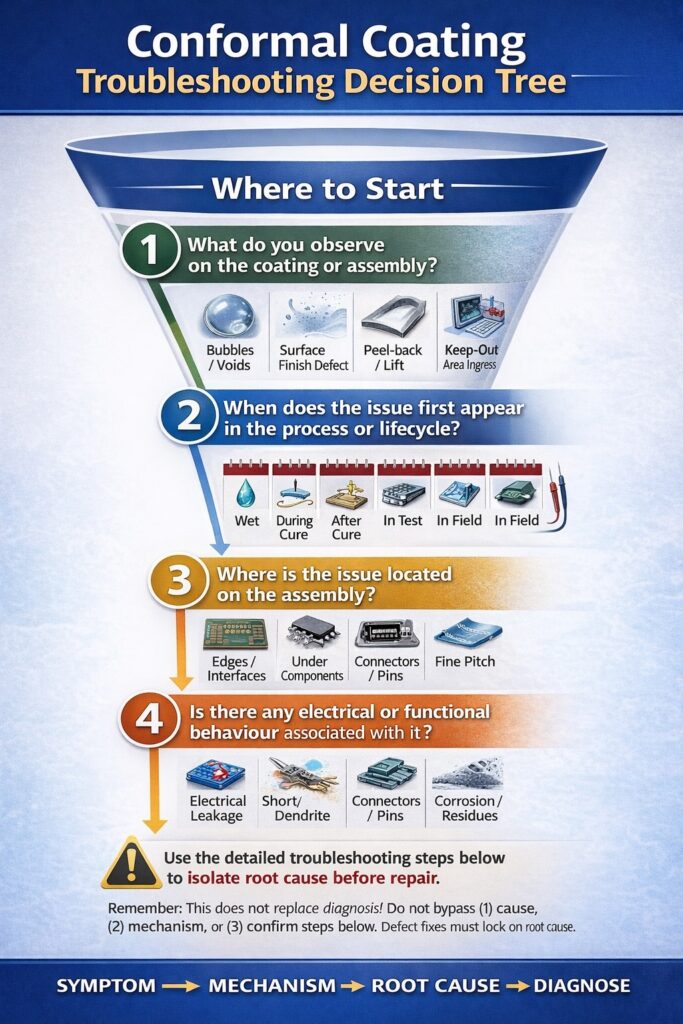
Conformal coating troubleshooting decision flow used to orient operators and engineers before detailed defect diagnosis, ensuring root cause is identified prior to touch-up or strip and recoat.
Article Quicklinks
| Topic | More |
|---|---|
| When to use this: what the decision tree does (and doesn’t) | 🔗 |
| Step 0: containment + stop-the-line checks | 🔗 |
| Step 1: classify the symptom (coverage / finish / cure / adhesion / electrical) | 🔗 |
| Step 2: location logic (edges, keep-outs, under parts, fine pitch) | 🔗 |
| Step 3: confirm mechanism with minimum tests (don’t guess) | 🔗 |
| Step 4: corrective actions (process fixes) vs repairs (board fixes) | 🔗 |
| Step 5: link to accept / touch-up / strip & recoat rules | 🔗 |
| Fast links: route to the right defect article quickly | 🔗 |
When to Use This Conformal Coating Troubleshooting Decision Tree
- Use this page when you have a defect, reject, or field return and need to isolate the root cause with repeatable logic.
- Use the Identification Guide when you just need fast routing from appearance to the best-fit mechanism.
- Escalate immediately if the issue is electrical safety-critical, customer stop-ship, or indicates corrosion / ECM / CAF risk on biased conductors.
This decision tree is intentionally “process-first”: a perfect local touch-up is meaningless if the upstream cause remains active.
Step 0 — Containment Before You Troubleshoot
Stop the drift
- Quarantine affected lots (don’t mix with “good” WIP).
- Freeze variables: same operator, same chemistry batch, same settings, same cure profile, same masking method.
- Capture evidence: UV + white light photos, location map, time stamps (clean → coat → cure), coating batch, viscosity, booth RH/temp.
Rapid checks (10–15 minutes)
- Masking boundary audit: look for edge damage, residue transfer, or ingress into keep-outs.
- Environment: confirm booth RH/temperature stability and compressed air quality.
- Viscosity & pot life: verify against your control window (don’t assume it’s fine).
- Cure profile: confirm time/temperature/UV dose matches the qualified recipe (and the real part temperature).
If the defect is at or near a keep-out boundary, assume masking or selective pathing until proven otherwise.
Step 1 — Classify the Symptom Family
A) Coverage / boundary symptoms
- Missing/thin coating, UV weak zones, “holidays”, shadowing behind tall parts.
- Coating in connectors/test pads/mating faces; boundary bleed; keep-out contamination.
B) Flow / finish symptoms
- Runs/sags/curtains, pooling/puddling, rough/texture problems, orange peel.
- Cratering/fish-eyes, dust/fibres/FOD embedded, surface haze/residue films.
C) Cure / film formation symptoms
- Pinholes/bubbles/foam, bubbles appearing during/after cure (outgassing/blisters).
- Tacky/soft cure, brittle/over-cure, wrinkling/recoat distortion.
D) Adhesion / interface symptoms
- De-wetting islands, peel-back at boundaries, mask-edge lift during demask, delamination.
- Intercoat adhesion failure: flaking/edge lift/wrinkling between layers or touch-ups.
E) Electrical / electrochemical symptoms
- SIR leakage, intermittent shorts, dendrites/ECM, corrosion patterns, CAF in laminate.
If you’re unsure, route via the Defect Identification Guide and then return here to isolate root cause and process fixes.
Step 2 — Apply Location Logic (The “Where” Tells You the “Why”)
- At keep-out boundaries (connectors/test pads/mating faces): masking or selective recipe/pathing is the prime suspect.
- Behind tall components: shadowing / approach angle / access limitations.
- Under low-standoff parts: capillary wicking, trapped solvent/moisture, ionic residues, outgassing risk.
- Fine pitch / biased conductors: SIR leakage, ECM/dendrites, contamination + moisture + bias mechanisms.
- Edges / board perimeters: film thinning, moisture pathways, handling contamination, cure gradients.
- Only on plastics/connector bodies: low surface energy, mould release/silicone transfer, incompatibility.
This step prevents the classic failure: spending hours tuning spray settings when the real issue is masking boundary damage or contamination transfer.
Step 3 — Confirm the Mechanism (Minimum Tests, Maximum Certainty)
Visual + simple process confirmations
- UV + white-light inspection: coverage, thin edges, voids, contamination, boundary damage.
- Solvent swab / tack check (where valid): under-cure and surface films.
- Thickness verification (coupons / defined checks): confirm film build vs spec and local pooling risk.
Electrical / contamination confirmations (when symptoms point to reliability risk)
- SIR / humidity-bias where appropriate to replicate leakage / ECM risk.
- ROSE for process drift monitoring on comparable product/process.
- Ion chromatography for ionic species identification and source tracing (higher criticality).
If you suspect ECM/dendrites, SIR leakage, CAF or corrosion, do not “rework and hope” — confirm contamination/moisture/bias risk and treat it as a control-plan issue.
Step 4 — Split Actions Into Two Tracks
Track 1: Process corrective actions (prevention)
- Masking control: method selection (shield vs sealed barrier), fit/seal, removal timing, post-demask inspection rules.
- Cleanliness control: validated wash/rinse/dry, handling discipline, compressed air quality, contamination transfer points.
- Recipe control: viscosity window, spray atomisation, distance, overlap, flash-off discipline, cure profiling.
- Environment control: booth RH/temp stability, airflow management, tack-off steps, FOD control.
Track 2: Product repair actions (containment)
- Local removal + touch-up (only if mechanism is localised and verification is possible).
- Strip + re-clean + verify + recoat (for systemic failures or hidden-risk mechanisms).
Rule of thumb: if you cannot inspect/verify the affected area (under low-standoff parts, deep interfaces, hidden conductors), assume the mechanism may remain active and escalate repair level.
Step 5 — Apply Acceptance & Repair Rules (Don’t Invent Them on the Line)
Once you’ve confirmed the mechanism, apply the pre-defined decision rules for accept, touch-up, or strip & re-coat. This prevents “operator judgement drift” from becoming a new failure mode.
Use: Defect Acceptance & Repair Rules and the Top 10 Root Causes page to lock your upstream controls.
Fast Links: Route to the Correct Defect Article
Use these links once you’ve classified the symptom family (Step 1) and applied location logic (Step 2).
Coverage & Boundary
- Insufficient Coverage & Shadowing
- Coating Ingress into Keep-Out Areas
- Bridging & Webbing
- Capillary / Wicking
Flow & Finish
- Runs, Sags & Curtains
- Pooling & Puddling
- Orange Peel
- Texture & Finish Defects (Router)
- Blooming / Surface Residue
- Fish-Eyes & Craters
- Dust, Fibres & FOD
Cure-State & Film Formation
- Pinholes, Bubbles & Foam
- Bubbles After Cure (Outgassing / Blisters)
- Haze, Whitening & Blushing
- Tacky / Soft-Cured (Under-Cure)
- Brittle / Over-Cured
- Wrinkling (Recoating / Distortion)
Adhesion & Interfaces
- De-wetting
- Poor Adhesion on Plastics / Connectors
- Mask-Edge Lift & Demask Damage
- Intercoat Adhesion Failure (Recoat / Touch-Up)
- Delamination
Reliability & Electrochemical
Looking for Other Defect Types?
This page covers the Troubleshooting Decision Tree for conformal coating defects. For the complete index of defect types and links to each technical article:
Training on Conformal Coating Defects
SCH delivers practical, standards-driven training covering defect identification, troubleshooting workflows, cleanliness control, inspection discipline, and the wider defects framework used to prevent repeat failures.
Industry Standards We Work To
SCH Services aligns coating services, training, equipment supply and materials to relevant IPC standards, including:
- IPC-A-610 – Acceptability of Electronic Assemblies
- IPC-CC-830 – Qualification & Performance of Conformal Coatings
- IPC-HDBK-830 – Conformal Coating Handbook (guidance and best practice)
For further details on IPC standards:
electronics.org/ipc-standards ↗
Explore Topic Hubs
Conformal Coating Processes Hub
Conformal Coating Equipment Hub
Conformal Coating Masking Hub
Conformal Coating Design Hub
Conformal Coating Defects Hub
Inspection & Quality Hub
Removal & Rework Hub
Standards Hub
Parylene Basics Hub
Parylene Application Hub
Why Choose SCH Services?
You gain a complete, integrated platform for Conformal Coating, Parylene & ProShieldESD—plus equipment, materials and training—backed by decades of hands-on process support.
- 🛠️ End-to-End Support – Selection, masking, inspection and troubleshooting.
- ✅ Process Discipline – Recipes, control windows and repeatability.
- 🌍 Global Reach – Support across Europe, North America and Asia.
📞 Call: +44 (0)1226 249019 | ✉ Email: sales@schservices.com | 💬 Contact Us ›