Parylene Defects & Failure Mechanisms (Root Causes, Diagnosis & Prevention)
How to diagnose, prevent and control Parylene coating defects in real production
← Back to the Parylene Process & Reliability Hub
The infographic below summarises how Parylene defects develop and how structured process controls prevent pinholes, haze, adhesion loss and thin spots in high-aspect features.
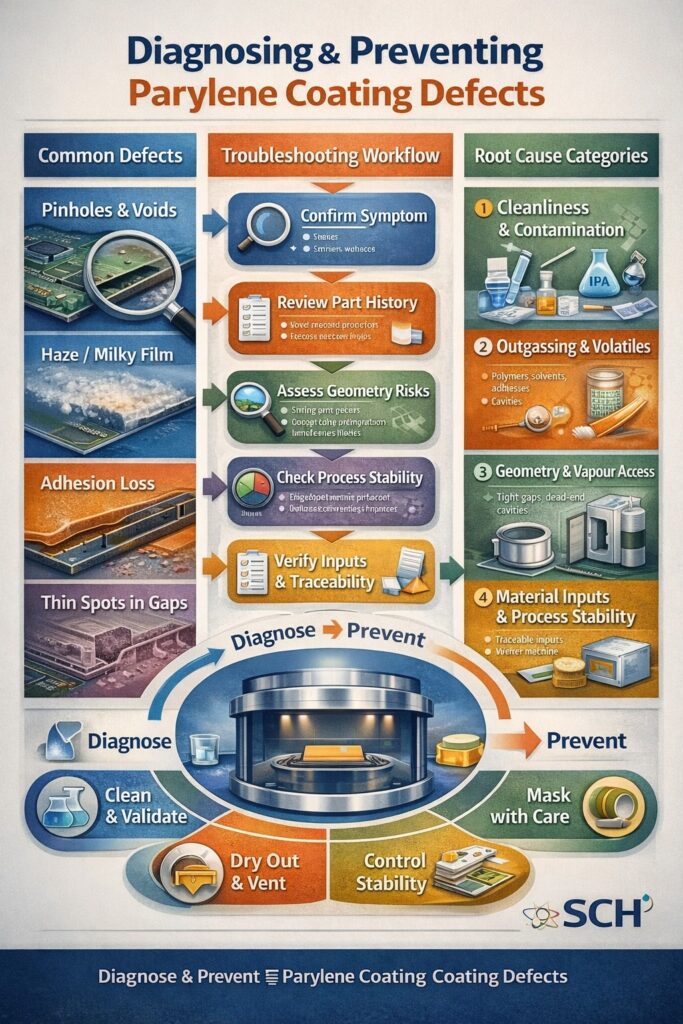
Diagnostic framework for Parylene coating defects showing symptom identification, root-cause categories (contamination, outgassing, geometry and process stability) and prevention controls.
Quick Links
- Why Parylene defects differ from liquid coatings
- Fast diagnosis workflow
- Defects by impact (engineer priority view)
- The “big four” root-cause categories
- Chamber physics: vapour transport, mean free path & aspect ratio
- SCH Parylene Reliability Framework (professional standard)
- Repair vs strip vs re-run
- FAQs
Why Parylene defects differ from liquid conformal coatings
Parylene is deposited from the vapour phase and polymerises on surfaces under vacuum (room temperature CVD). As a result, traditional liquid coating defects such as runs, sagging and orange peel are largely irrelevant. Instead, the dominant reliability risks are driven by:
- Geometry controlling coverage (tight gaps, dead-end cavities, sealed volumes and diffusion limits can create thin film where it matters most).
- Volatiles mobilised during pump-down (moisture/solvents/plasticisers can migrate and disturb polymer growth, producing haze, pinholes or weak interfaces).
- Cleanliness and contamination (NVR, ionics, silicones and particulates can drive adhesion loss, pinholes and electrical leakage).
- Process stability and inputs (dimer handling, chamber condition, deposition rate stability and traceability directly affect yield).
If you need baseline process context, start here: Parylene Deposition Process Parameters.
Fast diagnosis workflow (what to check first)
- Confirm the symptom: integrity (pinholes/voids), optical (haze), coverage (thin spots), mechanical (cracking/flaking), adhesion (lift/delam), or electrical (leakage/drift).
- Review the part history: cleaning chemistry, dry-out/pre-bake, masking approach, handling/packaging, storage time, and any silicone/oil/mould-release exposure.
- Assess geometry risks: sealed cavities, dead ends, high aspect ratio bores, very tight gaps, porous substrates, mixed materials and sharp edges.
- Check process stability: witness coupon behaviour, thickness repeatability, deposition rate stability, chamber maintenance cadence.
- Verify inputs & traceability: dimer type/lot/COA, storage controls (moisture protection), and any suspected particulates or handling changes.
If the failure looks geometry-driven, go straight to: Parylene Clearances & Gaps (Design Rules). If the defect concentrates at keep-outs or boundaries, review: Parylene Masking.
Defects by impact (engineer priority view)
This table groups Parylene defects by the way they typically impact performance. Use it to prioritise investigation and prevention controls.
For broader defect definitions (useful for training and audits), cross-reference: Conformal Coating Defects Hub. Then return here for Parylene-specific mechanisms.
The “big four” root-cause categories (covers most real failures)
1) Cleanliness & contamination control (NVR, ionics, silicones)
For Parylene, cleanliness is the foundation. Particulates seed pinholes; NVR films create weak interfaces; ionics + moisture + bias can drive leakage paths; silicones/oils/mould release are common “invisible” adhesion killers. If a defect pattern changes suddenly, assume an upstream contamination shift until proven otherwise.
2) Outgassing & trapped volatiles (polymers, adhesives, cavities)
Vacuum processes mobilise volatiles. Moisture, solvents, plasticisers, flux residues or absorbed contaminants can migrate during pump-down/deposition and disturb polymer growth, creating haze, pinholes or weak boundaries. Dry-out/pre-bake is not generic; it must match the substrate limits and geometry.
3) Geometry & vapour access (thin film where you care most)
Parylene is highly conformal, but vapour access is still physics. High-aspect bores, tight gaps and dead-end cavities can reduce thickness in critical regions or encourage unintended encapsulation. Use proven clearance rules and validate coverage where function is sensitive: Parylene Clearances & Gaps.
4) Material inputs & process stability (yield, repeatability, cost control)
In scalable operations, reliability is built on repeatability: thickness control, stable deposition rate, chamber condition, fixture discipline, and lot traceability. Material inputs matter too. For example, haze or a milky appearance can sometimes be traced to moisture absorption or impurities introduced via dimer storage/handling or chamber condition. High-yield Parylene production treats dimer lot control, moisture protection and stable machine cycles as first-order variables — because yield is a quality metric and a cost driver.
Related reading: Dimer Comparison (N, C, D & AF-4).
Chamber physics: vapour transport, mean free path & aspect ratio limits
When engineers see “thin spots in gaps,” the cause is often not “poor coating” — it’s vapour transport limits. Under vacuum, monomer molecules must diffuse into a feature before polymerising on the nearest available surface. As the aspect ratio increases (deep and narrow cavities), there is a point where diffusion cannot maintain the same delivery rate as open surfaces. The practical result is reduced thickness (or higher variability) at the bottom of tight features.
Practical takeaway: critical internal features should be treated as a design requirement, not a hope. Use vent paths where possible, avoid dead-end geometry, and verify coverage with targeted inspection where function is sensitive.
If you are specifying very thin dielectric films (e.g., 1–5µm) or coating high aspect ratio features, your thickness strategy matters: Parylene Thickness & Environmental Protection.
SCH Parylene Reliability Framework (professional standard)
To run Parylene as a scalable, high-yield process, prevention must be structured. The framework below turns “best practice” into repeatable controls.
1) Cleaning validation (not just cleaning)
- Define the contamination risks: flux residues, machining oils, mould release, silicone exposure, NVR and ionics.
- Validate cleaning effectiveness: where appropriate, use methods such as ionic contamination testing (e.g., ionic chromatography / ROSE-style approaches) and surface energy checks (dyne pens / contact angle thinking) to support adhesion-critical builds.
- Control post-clean handling: gloves, clean packaging, controlled storage time, avoid re-contamination.
2) Dry-out and outgassing control
- Dry-out is geometry + material dependent: match bake profiles to substrate limits and the presence of cavities/porosity.
- Prevent “sealed volume breathing”: vent where possible and avoid dead-end cavities that drive volatile migration through boundaries.
3) Masking as a system (vacuum compatibility + outgassing discipline)
- Vacuum pull-down changes adhesive behaviour: some masking adhesives can outgas under vacuum, and those volatiles can deposit at boundaries, contributing to edge lift, poor edge definition or local haze.
- Standardise masking materials and cleanliness: boots, tapes and fixtures must be controlled like process consumables, not general workshop items.
- Inspect boundaries as “critical zones”: edge definition, leakage and keep-out integrity should be verified under magnification.
Related: Masking Solutions | Parylene Masking
4) Process stability and yield optimisation
- Witness coupons every run: thickness verification and trend monitoring.
- Lot traceability: dimer type and lot recorded with run ID; moisture-protected storage controls defined.
- Repeatable chamber cycles: stable deposition rate and routine chamber hygiene reduce defect variability.
- Thermal transitions matter: uncontrolled cool-down or poor post-process thermal management can exacerbate cracking/flaking, especially with thick films, sharp edges or CTE mismatch assemblies.
Thickness verification planning: AQL, Coupons & SPC
Repair vs strip vs re-run (how to make the call)
Not every defect justifies a strip-and-recoat. Decide based on function at risk, defect location, defect density, and root-cause confidence.
- If defects are systemic (witness coupons show it too), do not “touch-up” your way out. Correct the root cause first, then re-run with proof (coupons + thickness + inspection plan).
- If defects are localised and outside critical zones, document acceptance criteria and inspection evidence.
- If reliability is uncertain, default to controlled decisions aligned to your acceptance criteria: Inspection Acceptance Criteria.
For broader rework thinking, see: Removal & Rework Hub. For precision Parylene removal capability, see: Vaniman Problast (Parylene Removal).
Seen a Defect You Can’t Explain?
Defects often originate from interactions between cleaning, masking, fixturing, geometry and deposition conditions — not just a single cause. It’s critical to identify the root cause reliably.
🔍 Book a Defect Diagnosis & Process Review – Our team can evaluate your findings and help you build a corrective action plan that improves yield and process consistency.
FAQs
Is Parylene always pinhole-free?
Parylene films can be extremely uniform and low-defect, but “pinhole-free” is not a guarantee. Pinholes are commonly seeded by particulates, residues (NVR/ionics), moisture/outgassing, chamber condition, or process instability. Use witness coupons and defined inspection plans to validate stability.
Why do we see thin coverage in tight gaps if Parylene is conformal?
Conformality does not remove physics. Vapour transport and diffusion limits can reduce thickness deep in high-aspect features, and dead-end cavities can trap volatiles that disturb polymer growth. Treat critical internal features as a design requirement and validate coverage where it matters.
What typically causes haze or a milky Parylene appearance?
Haze is often linked to moisture/outgassing and chamber condition. In some cases, it can be traced to dimer storage/handling (moisture absorption) or impurities. Lot traceability, moisture-protected storage and stable chamber cycles reduce variability.
Can masking cause Parylene defects?
Yes. Mask leakage, poor edge definition, incompatible adhesives and boundary contamination can cause edge lift and local defects. Under vacuum, some adhesives can outgas during pull-down and deposit volatiles near keep-outs. Treat masking as a controlled system, not just a consumable.
How do we decide if a defect is cosmetic or reliability-critical?
Assess function and location. A small haze may be cosmetic; a pinhole near high-impedance nodes or in a moisture/ionic exposure path can be reliability-critical. Define critical zones in the specification and inspect those regions with higher scrutiny.
Why Choose SCH Services?
Partnering with SCH means gaining a complete, integrated platform for Conformal Coating, Parylene & ProShieldESD with equipment, materials, and training, backed by decades of hands-on experience.
- ✈️ 25+ Years – trusted worldwide
- 🛠️ End-to-End Support – coating, masking, application, inspection
- 📈 Scalable Solutions – prototypes to high-volume
- 🌍 Global Reach – support in EU, NA, Asia
- ✅ Process Control – traceability, coupons, inspection discipline
📞 Call: +44 (0)1226 249019 | ✉ Email: sales@schservices.com | 💬 Contact Us ›
Fast links: Parylene Coating Services | Parylene Training & Support | Consultancy