Masking Application Best Practices
Operator Techniques That Prevent Leakage, Residue, and Rework
In conformal coating, masking failures are rarely caused by coating chemistry. In most production environments, defects trace back to operator technique, masking sequence, and inconsistent application discipline.
This guide focuses on practical masking best practices for liquid conformal coating: how to apply masking tapes, dots, shapes, and boots consistently, how to avoid common application errors, and how to verify masking before coating so defects do not appear later in inspection or test.
For material selection (what to use and why), see: Masking Material Selection for Conformal Coating.
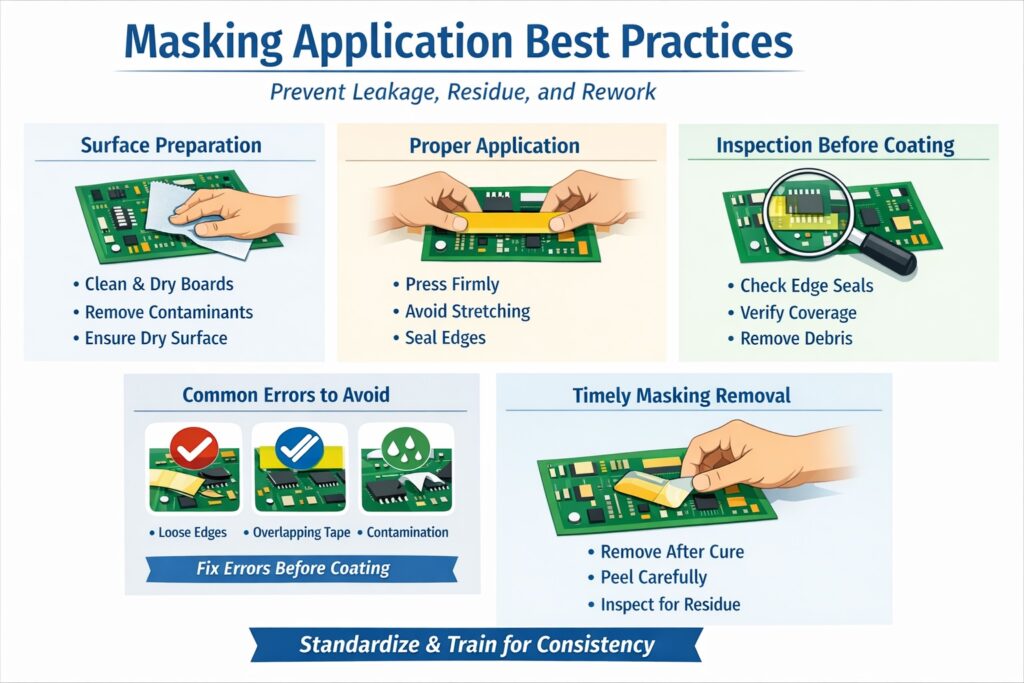
Masking application best practices showing correct operator technique, masking sequence, inspection before coating, and defect prevention controls.
Operator Technique and Consistency
Masking is a controlled process step. The same masking material can perform well or fail completely depending on how it is applied. Best practice is to define a standard method and train operators to execute it consistently.
Core technique rules
- Apply to clean, dry surfaces — masking over contamination increases leakage risk and adhesive transfer.
- Use firm, controlled pressure — burnish edges to seal boundaries without damaging the assembly.
- Avoid stretching or tension — tension encourages edge lift and creates leakage paths.
- Minimise touch contamination — avoid handling adhesive surfaces; use peel-and-place technique for dots and shapes.
- Make boundaries intentional — define a clear edge line; avoid “floating” masks with unclear coverage intent.
Practical indicator: if operators frequently re-press edges mid-process or “patch” gaps with off-cuts, the method is not stable and needs correction.
Masking Sequence Within the Coating Process
Masking success depends on sequencing. A good masking method can fail if the board sits too long, is handled excessively, or moves between uncontrolled environments before coating.
Recommended sequence
- Clean and dry the assembly and confirm no residues remain.
- Apply masking using the approved masking set (tape, dots, shapes, boots as required).
- Seal edges by controlled burnishing of tape boundaries and correct seating of boots/plugs.
- Inspect masking (see below) and correct any high-risk boundaries before coating.
- Coat within the validated dwell window — long delays increase removal difficulty and defect risk.
- Remove masking at the defined stage (after coat/cure per your process) to minimise tearing and residue.
If your process requires staged queues or hold points, validate masking performance at the maximum realistic dwell time — not the ideal case.
For design-related keep-outs and how to specify them, see: Masking Design Guidelines for PCBs & Assemblies.
Common Application Errors
Most masking defects are caused by repeatable errors. Eliminating these delivers immediate yield improvement.
High-frequency errors and what they cause
- Poor edge sealing → coating leakage under tape boundaries, irregular edges.
- Masking over contamination → edge lift, residue transfer, localised de-wetting.
- Overlapping tape at boundaries → capillary leakage paths and trapped contamination.
- Inconsistent dot placement → exposed pads/vias or partial coverage leading to rejects.
- Boots not fully seated → ingress into connectors or terminals, difficult rework removal.
- Excessive dwell time before coating → difficult removal, tearing, residue risk.
- “Fixing” removal using solvents → contamination and downstream coating adhesion issues.
If you are seeing recurring masking-caused NCRs, the fastest route to improvement is to standardise the masking set and the application method, then audit adherence weekly until stable.
For a wider view of how masking drives defects, see: Why Masking Causes Most Conformal Coating Defects.
Inspection Before Coating
Masking should be verified before coating because most masking failures are expensive to correct later. A short pre-coat inspection step prevents a high proportion of rework.
Pre-coat masking inspection checklist
- Edges sealed — no visible lift, wrinkles, channels, or gaps at boundaries.
- Coverage correct — keep-out areas fully protected with no partial exposure.
- No contamination — no fingerprints, fibres, dust, or loose fragments on mask surfaces.
- Boots seated — connectors and terminals fully covered with a stable seal.
- Dots/shapes aligned — centred on pads/vias with consistent placement across the batch.
Tip: If inspection depends on operator judgement alone, defects will recur. Define accept/reject criteria with photo examples and make inspection part of the work instruction.
For removal checks after coating, see: Masking Removal & Verification After Coating.
Training and Process Discipline
Masking performance is not improved by “working harder”. It improves when the process is controlled: defined materials, defined methods, and consistent training.
What to standardise
- Approved masking set per assembly type (tape, dots, shapes, boots, liquid mask if required).
- Method (application technique, burnishing, sequencing, and dwell limits).
- Inspection criteria with visual examples of good vs bad boundaries.
- Operator training and periodic competency re-checks.
If masking is treated as a controlled step, you reduce leakage, residue, and inspection escapes — and you protect both throughput and reliability.
For practical operator training, see: Conformal Coating Training.