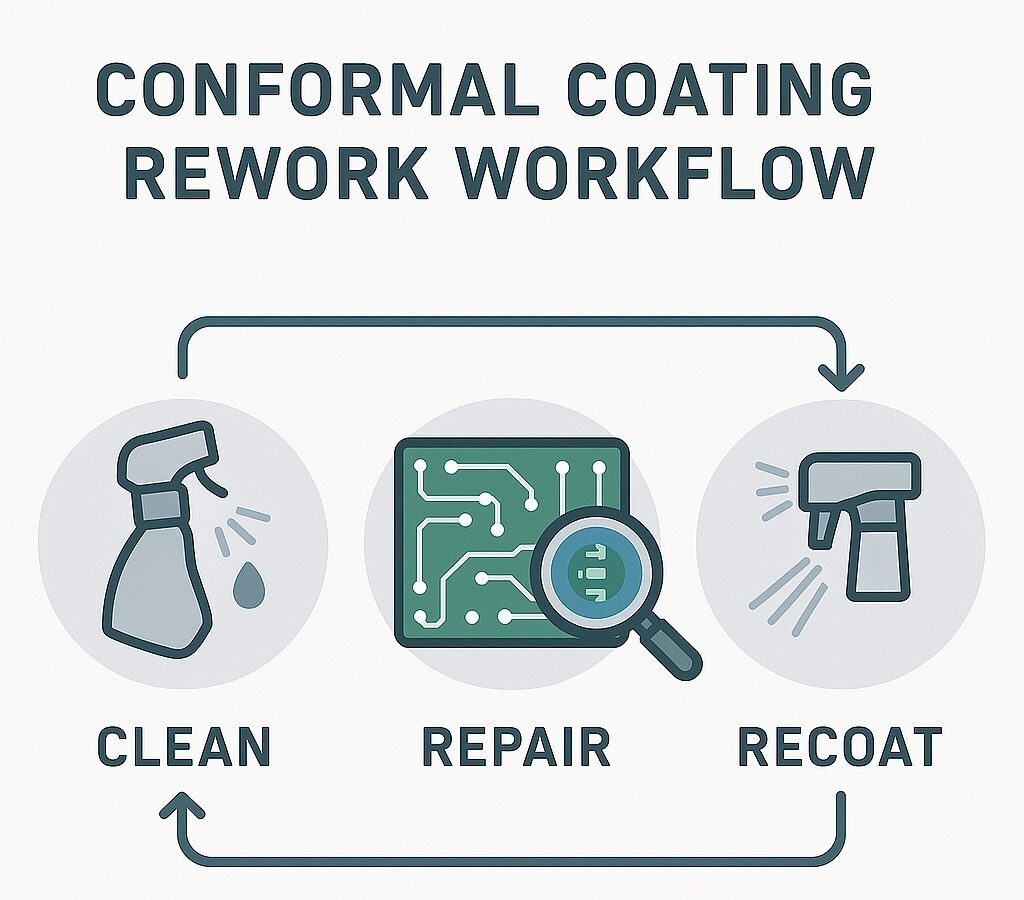
Conformal Coating Rework Workflow: Clean, Repair, Recoat
Structured PCB rework workflow for conformal coating repair and reapplication
← Back to the Removal & Rework Hub
The conformal coating rework workflow follows three critical stages: clean, repair, and recoat. Each step is supported by inspection, ESD controls, and documentation to ensure long-term reliability. Following a proven workflow helps restore coated PCBs to IPC expectations while minimising risks during repair and recoat operations.
If you need to choose the safest stripping route first, read Conformal Coating Removal Methods (Wet & Micro-abrasion).
For Parylene-specific repair and recoating decisions, read our Insight on whether Parylene can be removed and successfully reapplied.
If coating type is unknown, use Identify Unknown Conformal Coatings (IPC-7711 Method) before selecting a removal process.
Conformal Coating Rework Workflow Quick Links
Related Guide: Micro-Abrasive Media Selection
If your workflow uses micro-abrasion for local removal, media selection (e.g., VanAcrylic), particle size and changeover discipline are key drivers of boundary quality and substrate risk.
1) Intake & Assessment in the Conformal Coating Rework Workflow
- Confirm requirements, keep-outs, thickness targets, and acceptance criteria.
- Identify coating type and affected areas (use UV inspection to map coverage).
- Select the removal method using Removal Methods (Wet & Micro-abrasion) and confirm whether removal should be local or full using Local vs Full Stripping.
- If coating type is uncertain, use Identify Unknown Conformal Coatings (IPC-7711 Method) before selecting solvents, media or pressure.
- Enable ESD controls (grounding, mats, wrist straps, packaging).
2) Clean
- Remove debris; mask sensitive zones with masking tapes & dots or reusable boots.
- Apply solvents or aqueous cleaners using controlled methods such as polyester cleaning swabs to clean localised areas, component leads, and tight access features without spreading contamination.
- Inspect under UV/white-light booths to confirm cleanliness and edge definition.
- Rinse and dry carefully to reduce risk of defects such as de-wetting or electrochemical issues linked to ionic contamination.
3) Repair Stage
- Perform selective coating removal using the chosen method: wet strip systems for compatible coatings, or
Vaniman micro-abrasion systems for local access and solvent-resistant coatings. - If micro-abrasion is used, apply process discipline from Inside the Micro-Abrasive Blasting Process (nozzle, standoff, angle, pressure and technique).
- Complete component rework or replacement; confirm pad integrity under digital microscopes.
- Prepare recoat boundaries and feather edges carefully; poor edge prep can increase risk of delamination.
4) Recoat Stage
- Re-mask keep-outs; confirm edge quality with UV inspection.
- Reapply coating (spray, selective, or dip) to target thickness.
- Cure per datasheet; avoid finish and film-formation defects such as orange peel or pinholes and bubbles.
Where Parylene has been removed, recoating should be assessed carefully because success depends on contamination control, surface condition, boundary quality and the original coating history. See Can Parylene Be Removed and Reapplied?.
Inspection & Verification in the Rework Workflow
- Verify coverage and edge definition under UV inspection.
- Measure thickness using eddy-current gauges or optical meters; manage plans using AQL, coupons, and SPC.
- Record results and confirm compliance with standards such as IPC-A-610. (For SCH’s inspection framework, see inspection standards & methods.)
Documentation & Release
- Log rework details including removal methods, materials, operators, and lot codes.
- Attach inspection data and sign-off to the applicable IPC class.
- Use ESD-safe packaging and clearly label reworked assemblies.
Summary
The conformal coating rework workflow — clean, repair, recoat — provides a repeatable path for restoring protection and traceability. By combining robust inspection, ESD protection, controlled removal, and disciplined documentation, reworked PCBs can return to service with reliable performance.
For guidance on when to remove coating locally vs stripping an entire assembly, see Conformal Coating Removal: Local and Full Stripping.
Related Technical Guides
If you are building or auditing a controlled conformal coating rework workflow, the following guides expand on method selection, risk control, removal execution, and process discipline:
- For the full end-to-end decision framework (identify → select → control → validate), review the Ultimate Conformal Coating Removal Guide (UK & Europe).
- Compare stripping techniques and limitations in Conformal Coating Removal Methods (Wet & Micro-abrasion).
- For nozzle control, pressure selection, standoff distance, angle control and repeatability discipline, read Inside the Micro-Abrasive Blasting Process.
- If coating type is uncertain during intake, reduce risk using Identify Unknown Conformal Coatings (IPC-7711 Method).
- For abrasive choice (including VanAcrylic), particle sizing and media changeover discipline, use the Micro-Abrasive Media Selection Guide.
- For Parylene-specific removal and reapplication guidance, read Can Parylene Be Removed and Reapplied?.
Why Choose SCH Services?
Partnering with SCH Services means more than just outsourcing — you gain a complete, integrated platform for
Conformal Coating, Parylene & ProShieldESD Solutions, alongside equipment, materials, and training, all backed by decades of hands-on expertise.
- ✈️ 25+ Years of Expertise – Specialists in coating technologies trusted worldwide.
- 🛠️ End-to-End Support – Guidance on coating selection, Parylene grades, masking, inspection, and ProShieldESD integration.
- 📈 Scalable Solutions – From prototype batches to high-volume production, SCH grows with your needs.
- 🌍 Global Reach – Responsive support across Europe, North America, and Asia.
- ✅ Proven Reliability – Built on quality, consistency, and customer satisfaction.
📞 Call: +44 (0)1226 249019 | ✉ Email: sales@schservices.com | 💬 Contact Us ›