Parylene Cleaning, Surface Preparation & Adhesion Control
How to prevent adhesion loss, delamination and “mystery” defects by controlling cleanliness, surface energy and outgassing
← Back to the Parylene Process & Reliability Hub
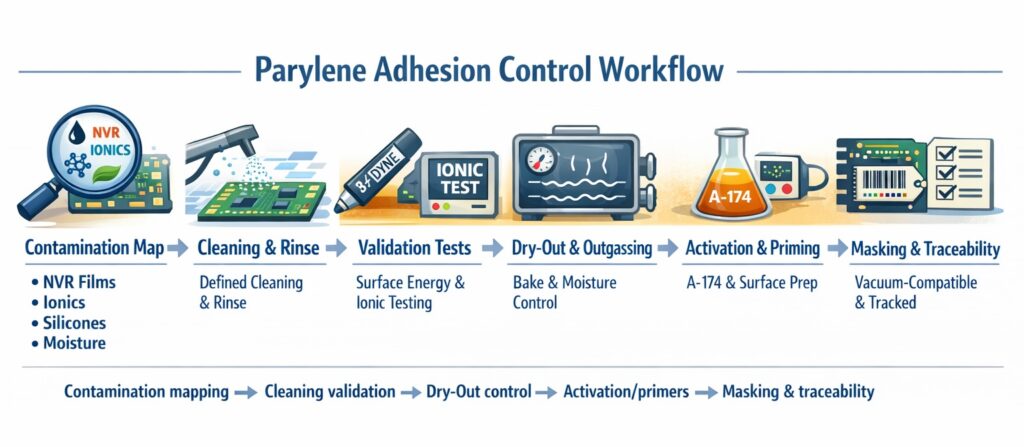
Parylene adhesion control workflow illustrating contamination mapping (NVR, ionics, silicones and moisture), cleaning validation, surface energy and ionic testing, controlled dry-out, A-174 adhesion promotion and vacuum-compatible masking with traceability.
How This Adhesion Workflow Prevents Parylene Failures
This workflow represents a structured, repeatable approach to controlling Parylene adhesion risk in production. Failures such as pinholes, haze, edge lift or delamination are rarely random — they are typically rooted in contamination, moisture, surface energy mismatch or uncontrolled masking boundaries.
By mapping contamination risk first, validating cleaning effectiveness, controlling dry-out and outgassing, applying appropriate surface activation (such as A-174 silane) and enforcing vacuum-compatible masking with traceability, adhesion performance becomes predictable and scalable.
Quick Links
- Why Parylene adhesion fails in real production
- Contamination map (NVR, ionics, silicones, particulates)
- Cleaning validation: what “clean enough” means
- Dry-out & outgassing control (vacuum reality)
- Surface activation & primers (incl. A-174)
- Masking as a vacuum system (outgassing, edge definition)
- Process controls: traceability, coupons, acceptance zones
- Troubleshooting: symptom → likely cause → next test
- FAQs
Why Parylene adhesion fails in real production
Parylene deposition is gentle on temperature, but it is not gentle on contamination. Under vacuum, volatile species can mobilise, migrate and re-deposit exactly where you least want them: boundaries, keep-outs, sharp edges and interfaces. In practice, adhesion loss usually comes from one (or a combination) of these mechanisms:
- NVR films (oils, surfactants, flux residues): weak boundary layers that prevent the polymer film from forming a strong interface.
- Ionics + moisture: reliability risk and leakage pathways; can also correlate with poor adhesion when residues remain.
- Silicones / mould release: “invisible” surface-energy killers; often present from gloves, sprays, labels, fixtures or upstream plastics.
- Outgassing during pull-down: trapped solvents/plasticisers/absorbed moisture disturbing growth and boundaries (haze + edge issues).
- Masking outgassing and boundary contamination: edge definition and keep-out failures that look like “adhesion problems”.
If you need the broader defect map for Parylene, cross-reference: Parylene Defects & Failure Mechanisms.
Contamination map (what to control)
Before you change cleaning chemistry, map the likely contamination sources. This prevents random “trial-and-error” changes that don’t survive scale-up.
If your issue concentrates at keep-outs, review: Masking for Parylene.
Cleaning validation: what “clean enough” means
For high-reliability Parylene builds, “we cleaned it” isn’t a control. Validation does not need to be complex, but it should be repeatable and tied to your failure modes.
Core principle
Validate the thing that is actually failing. When adhesion is the failure mode, surface-energy and boundary-layer control matter. Where electrical leakage is the risk, ionic contamination control matters. If haze/pinholes are the issue, volatiles + particulates are the likely drivers.
Practical validation methods (choose what fits your risk)
- Surface energy checks: dyne pens or contact-angle thinking as a practical indicator that you’ve removed low-energy films (especially silicone-like contamination).
- Ionic contamination testing (where appropriate): use a defined method and sampling approach for assemblies where ionics + moisture + bias is a credible risk.
- Visual + microscopy at boundaries: look at keep-out edges and known “defect zones” rather than only open areas.
- Time-to-coat discipline: define a maximum time between cleaning and deposition (and define packaging/storage conditions).
For quality planning structure, see: Thickness Verification Plans (AQL, Coupons, SPC) (the same discipline applies to Parylene).
Dry-out & outgassing control (vacuum reality)
In vacuum deposition, outgassing is not a theory — it is part of the process environment. Moisture and volatiles can migrate during pump-down and disturb film growth or weaken boundaries.
- Dry-out must match the substrate limits: don’t copy-paste bake profiles across plastics, elastomers, adhesives and mixed-material assemblies.
- Geometry matters: sealed volumes and dead-end cavities can “breathe” under pressure changes, pushing volatiles into critical zones.
- Packaging matters: storage materials can transfer NVR/silicones or trap moisture; treat packaging as a controlled input.
If geometry is driving defects (thin spots / boundary issues in tight features), cross-reference: Clearances, Gaps & Encapsulation Rules.
Surface activation & primers (incl. A-174)
When cleanliness is controlled and you still need more adhesion margin, you move into activation and priming. This is especially common on metals, ceramics, glass and certain polymer surfaces, or where long-life environmental exposure is expected.
Activation (what it’s doing)
- Increase surface energy / remove weak boundary layers: plasma or other activation methods can improve interface quality (process selection depends on materials and sensitivity).
- Improve consistency: activation can reduce run-to-run variability when upstream surface conditions fluctuate.
Primers / adhesion promoters
- A-174 silane (commonly used in Parylene): often applied to promote adhesion on suitable substrates; application method, coverage and cure discipline matter.
- Compatibility first: primers can introduce their own failure modes if over-applied, contaminated, or incompatible with the substrate or downstream requirements.
Rule: don’t use primers to “cover” poor cleaning. Use them to add controlled adhesion margin once cleanliness is stable.
Masking as a vacuum system (outgassing, edge definition, keep-outs)
Masking for Parylene is not the same as masking for liquid coatings. Under vacuum pull-down, some materials and adhesives can outgas, and those volatiles can deposit near boundaries and contribute to edge lift, poor edge definition or local haze.
- Standardise masking materials: treat boots/tapes/fixtures as qualified process consumables, not “whatever is available”.
- Control boundary cleanliness: edges are critical zones; inspect them intentionally.
- Design for masking: define keep-outs and access early to reduce operator variability.
Related: Masking Solutions | Masking for Parylene.
Process controls: traceability, coupons, acceptance zones
Once adhesion is stable, you keep it stable with repeatable controls:
- Traceability: cleaning method + dry-out profile + masking set + run ID + (where applicable) primer batch/lot.
- Witness coupons: verify thickness and look for run-to-run shifts that correlate with defects.
- Define critical zones: inspect and verify boundaries/keep-outs and high-risk electrical zones with higher scrutiny than open areas.
- Material inputs: if your process uses controlled dimer inputs, maintain lot traceability and storage discipline (moisture protection).
Related dimer reading: Dimer Comparison (N, C, D & AF-4).
Troubleshooting: symptom → likely cause → next test
If you need the full defect map and decision framework, use: Parylene Defects & Failure Mechanisms.
FAQs
Do we always need a primer (e.g., A-174) for Parylene adhesion?
Not always. Many parts coat well with strong cleaning + handling control. Primers are typically used to add adhesion margin on certain substrates, mixed-material assemblies, or high-reliability environments. They should not be used to compensate for poor cleaning or uncontrolled contamination.
What is the fastest way to confirm contamination is the cause?
Start with a controlled comparison: same part type, tightened cleaning + controlled handling + defined dry-out + standardised masking. If the defect rate shifts significantly, you’ve confirmed the mechanism is upstream (not “random chamber behaviour”). Surface-energy checks and boundary inspection accelerate diagnosis.
Can masking materials cause Parylene adhesion issues?
Yes. Under vacuum pull-down, some adhesives can outgas and deposit volatiles near boundaries, contributing to edge defects and local adhesion loss. Treat masking as a qualified system with standard materials, storage, cleanliness and boundary inspection.
Why do we get adhesion failures only on certain areas?
Localised failures often indicate local contamination or local outgassing/geometry effects: keep-out edges, trapped volumes, porous materials, handling points, or silicone transfer. Map the locations and compare them against handling steps, masking boundaries and packaging contact points.
Adhesion Inconsistent or Unpredictable?
Cleaning chemistry, surface handling, plasma treatment and adhesion promoter selection all directly affect long-term reliability.
🔬 Request an Adhesion & Surface Review – We can assess your preparation method and recommend practical improvements.
Why Choose SCH Services?
If you need Parylene adhesion to be stable in real production (not just “works once”), SCH can support you with process definition, masking strategy, validation planning, and controlled coating services.
- 🧪 Process-led approach – cleaning validation, dry-out control and boundary discipline
- 🔍 Inspection & evidence – defined acceptance zones, coupons, traceability
- 📈 Scale-up support – prototypes (E-runs) through to repeatable production
Fast links: Parylene Coating Services | Parylene Training & Support | Consultancy
📞 Call: +44 (0)1226 249019 | ✉ Email: sales@schservices.com | 💬 Contact Us ›